The cosmetic industry focuses heavily on product safety, hygiene, and quality control. Whether it is shampoo, face wash, lotion, serum, or cream, every product must be manufactured in a clean and contamination-free environment. Even a small amount of contamination in manufacturing equipment can affect product quality, stability, and consumer safety.
To maintain strict hygiene standards, cosmetic manufacturing companies use two important cleaning technologies called CIP (Clean-in-Place) and SIP (Sterilize-in-Place).
These systems allow manufacturers to clean and sterilize equipment without dismantling machines, saving time and ensuring consistent sanitation.
In this detailed guide, we will understand:
- What is CIP in the cosmetic industry
- What is SIP in the cosmetic industry
- How these systems work
- Uses of CIP and SIP
- Benefits in cosmetic manufacturing
- Difference between CIP and SIP
- Why these systems are important for GMP compliance
Let’s understand everything step-by-step.
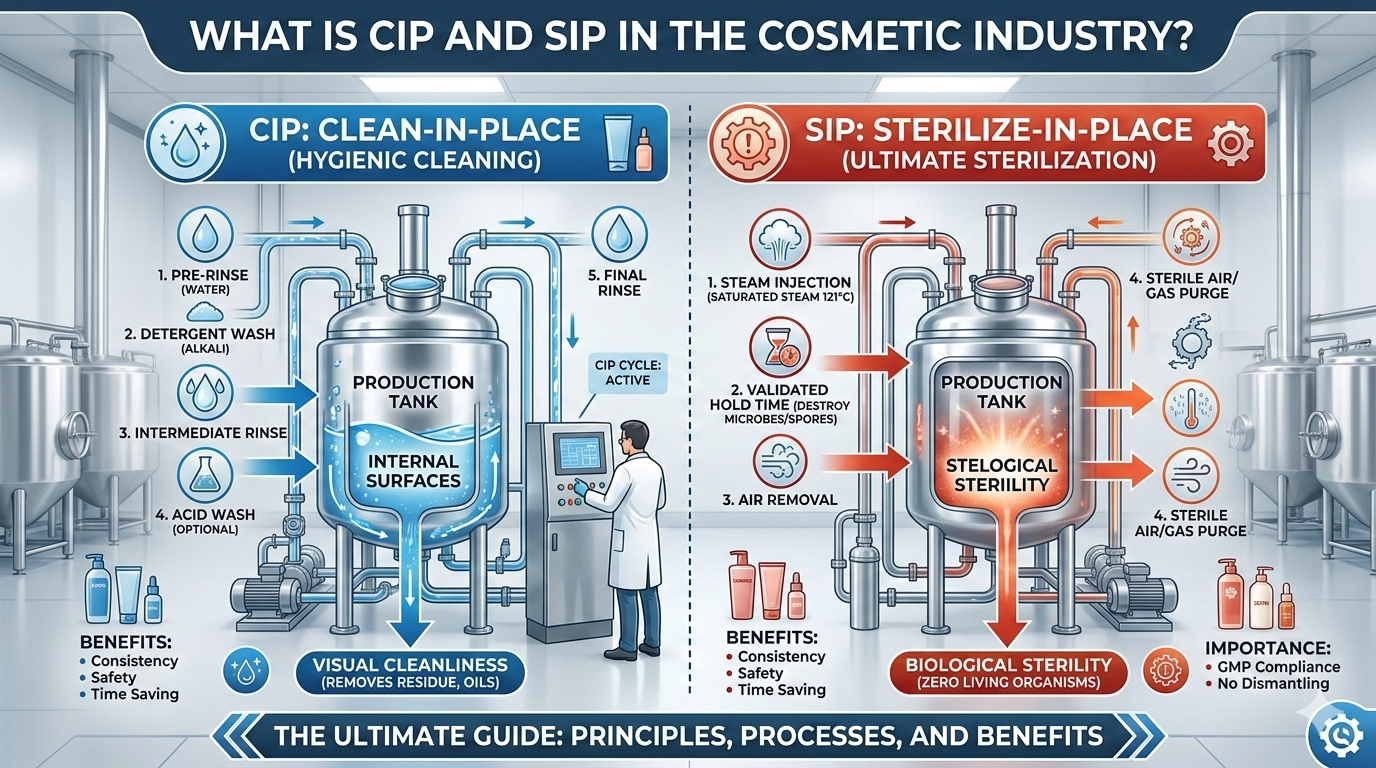
What is CIP (Clean-in-Place)?
CIP (Clean-in-Place) is an automated cleaning process used in the cosmetic industry to clean manufacturing equipment without disassembling it.
In this system, cleaning solutions like alkaline cleaners, detergents, and hot water are circulated through pipelines, tanks, mixers, and filling machines to remove product residues, oils, waxes, and other contaminants.
The main goal of CIP is to remove visible dirt and chemical residues from equipment surfaces.
Simple Definition
CIP is a method of cleaning internal surfaces of equipment, pipelines, and vessels without taking them apart.
Why CIP is Important in Cosmetic Manufacturing
Cosmetic products contain ingredients such as:
- Oils
- Surfactants
- Emulsifiers
- Waxes
- Herbal extracts
- Preservatives

These ingredients can stick to the surfaces of mixers, storage tanks, and pipelines.
If equipment is not cleaned properly, it can cause:
- Cross contamination
- Microbial growth
- Product spoilage
- Quality issues
CIP ensures thorough cleaning and consistent hygiene during production.
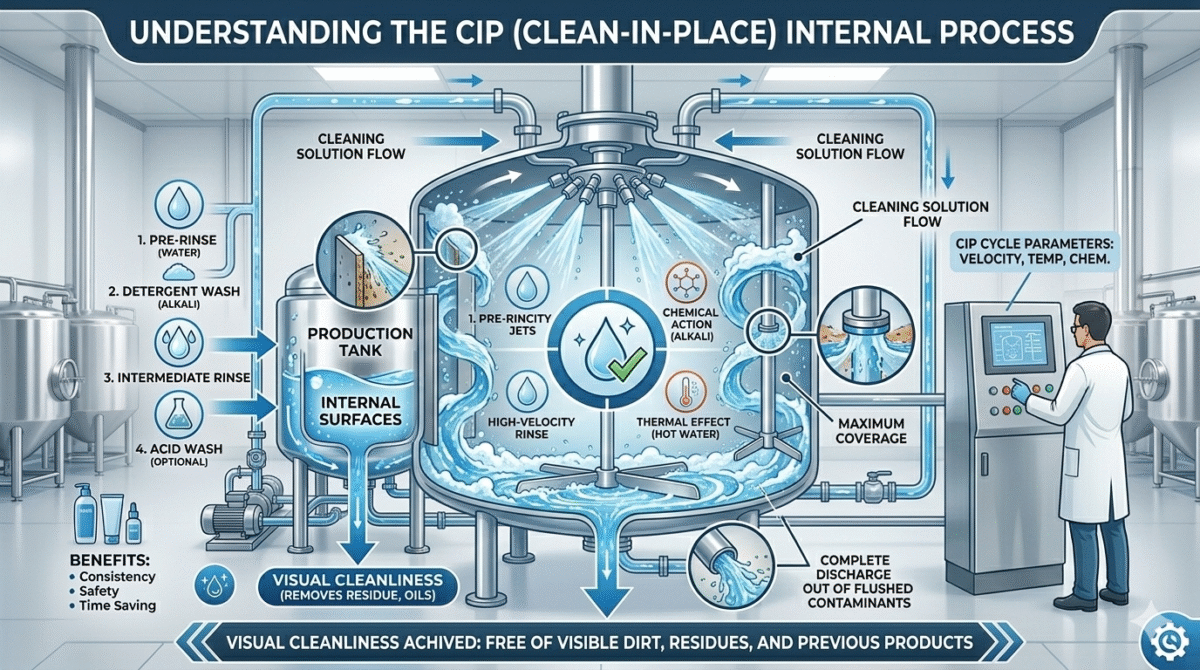
How CIP System Works
A typical CIP process follows several cleaning steps.
1. Pre-Rinse
The equipment is first rinsed with warm water to remove loose product residues.
This helps eliminate:
- Bulk cosmetic material
- Leftover shampoo or cream
- Surface oils
2. Detergent Cleaning
A cleaning solution (alkaline or acidic) is circulated through the system.
This step removes:
- Oil residues
- Emulsified creams
- Surfactants
- Sticky cosmetic ingredients
3. Intermediate Rinse
After detergent cleaning, the system is rinsed again with water to remove chemical residues.
4. Sanitization (Optional)
Some CIP systems include a sanitization step using:
- Hot water
- Sanitizing chemicals
5. Final Rinse
The final rinse ensures that no cleaning chemicals remain in the equipment.
After this, the system becomes ready for the next production batch.
Equipment Cleaned Using CIP
CIP systems are widely used to clean the following equipment in cosmetic manufacturing plants:
- Mixing tanks
- Storage vessels
- Pipelines
- Transfer pumps
- Homogenizers
- Filling machines
- Reactors
These machines are often connected through closed piping systems, making CIP extremely effective.
What is SIP (Sterilize-in-Place)?
SIP (Sterilize-in-Place) is a sterilization process used to kill microorganisms such as bacteria, yeast, and fungi inside equipment without dismantling it.
Unlike CIP, which focuses on cleaning, SIP focuses on sterilization.
SIP usually uses high-temperature steam or hot water to destroy microorganisms.
Simple Definition
SIP is a process of sterilizing equipment using steam or heat without taking the equipment apart.
Why SIP is Important in Cosmetic Manufacturing
Some cosmetic products are highly sensitive to microbial contamination.
For example:
- Face serums
- Natural skincare products
- Organic cosmetics
- Herbal formulations
- Water-based creams and lotions
These products can easily support microbial growth if manufacturing equipment is not sterile.
SIP ensures that equipment is free from harmful microorganisms before production starts.
How SIP System Works
The SIP process usually follows these steps:
1. Pre-Cleaning
Before sterilization, equipment is cleaned using a CIP process.
Sterilization works properly only when equipment is already clean.
2. Steam Injection
High-temperature steam (typically 121°C) is passed through pipelines and equipment.
Steam penetrates every internal surface.
3. Sterilization Hold Time
The equipment is maintained at high temperature for 15 to 30 minutes to kill microorganisms.
4. Cooling Phase
After sterilization, the equipment is cooled down gradually before production begins.
Equipment Sterilized Using SIP
SIP is commonly used for sterilizing:
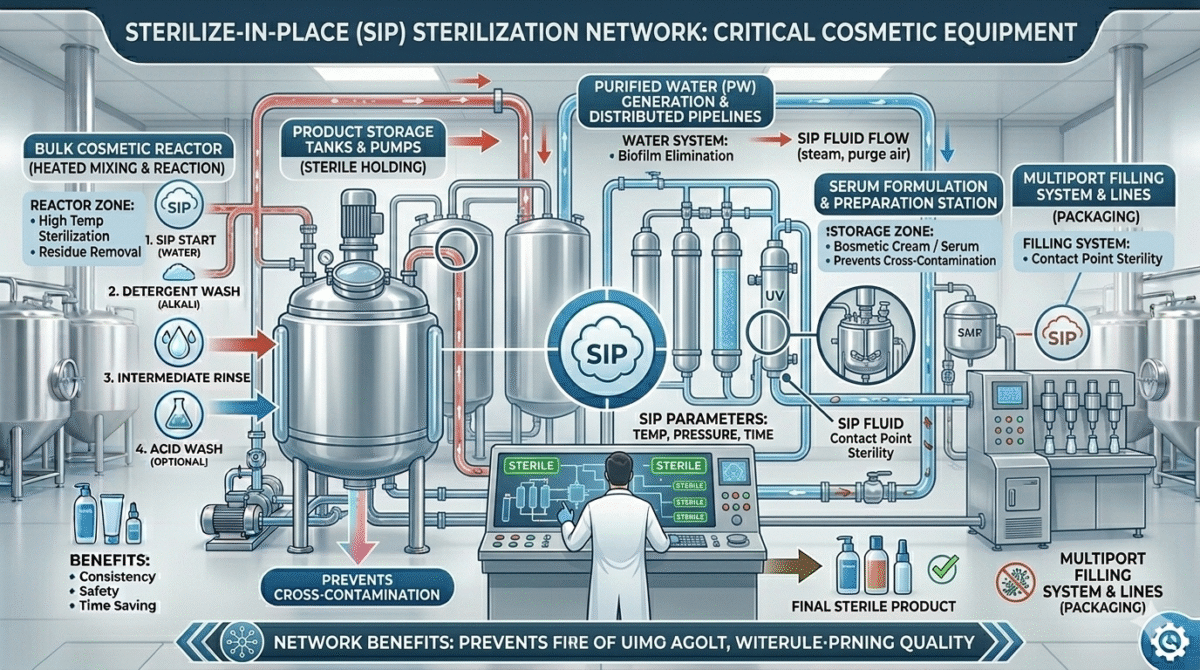
- Storage tanks
- Pipelines
- Cosmetic reactors
- Filling systems
- Water purification systems
- Serum manufacturing equipment
Uses of CIP in Cosmetic Industry
CIP systems are used for many applications in cosmetic manufacturing.
1. Cleaning Mixing Tanks
Mixing tanks used for shampoos, creams, and lotions must be cleaned after every batch.
CIP ensures no ingredient residues remain.
2. Cleaning Pipelines
Pipelines transfer cosmetic products between tanks.
CIP removes residues stuck inside pipes.
3. Cleaning Filling Machines
Filling machines used for bottles and tubes must remain hygienic to prevent contamination.
4. Removing Oil and Wax Residues
Many cosmetic formulations contain oils and waxes that stick to equipment surfaces.
CIP helps dissolve and remove them efficiently.
Uses of SIP in Cosmetic Industry
SIP is mainly used when high levels of sterility are required.
1. Manufacturing Sensitive Products
Products like serums and organic skincare require sterile equipment.
2. Microbial Control
SIP eliminates harmful microorganisms that can spoil cosmetic products.
3. GMP Compliance
Sterilization helps manufacturers follow Good Manufacturing Practices (GMP).
4. Sterilizing Water Systems
Purified water systems used in cosmetic production are often sterilized using SIP.
Benefits of CIP and SIP in Cosmetic Manufacturing
Using CIP and SIP systems provides many advantages.
1. Improved Hygiene
These systems ensure equipment is properly cleaned and sterilized.
This reduces contamination risk.
2. Time Saving
Equipment does not need to be dismantled for cleaning.
This saves significant production time.
3. Consistent Cleaning
Automated systems provide repeatable and reliable cleaning results.
4. Reduced Labor Cost
Manual cleaning requires more workers.
CIP systems reduce manpower requirements.
5. Better Product Quality
Clean equipment ensures cosmetic products maintain their quality and stability.
6. Compliance with Regulations
Cosmetic companies must follow:
- GMP guidelines
- Quality standards
- Safety regulations
CIP and SIP help meet these requirements.
7. Increased Production Efficiency
Since cleaning is faster, machines become available sooner for the next batch.
This improves production capacity.
Difference Between CIP and SIP
| Feature | CIP | SIP |
|---|---|---|
| Full Form | Clean-in-Place | Sterilize-in-Place |
| Purpose | Cleaning equipment | Sterilizing equipment |
| Removes | Dirt, residues, oils | Microorganisms |
| Method | Chemical cleaning solutions | Steam or heat |
| Temperature | Moderate temperature | High temperature |
| Application | Cleaning after production | Sterilization before production |
In simple terms:
CIP cleans the equipment, while SIP sterilizes it.
Both processes are often used together for maximum hygiene.
CIP and SIP in GMP Cosmetic Manufacturing
Modern cosmetic factories follow GMP (Good Manufacturing Practices) to ensure product safety.
CIP and SIP systems are important parts of GMP because they help:
- Maintain hygienic manufacturing environments
- Prevent cross contamination
- Ensure equipment sanitation
- Improve product safety
Regulatory authorities often inspect cleaning procedures during audits.
Proper documentation of CIP and SIP processes is also required.
Challenges of CIP and SIP Systems
Although these systems are very useful, they also have some challenges.
1. High Initial Cost
Installing automated CIP and SIP systems requires investment.
2. Proper Validation Required
Cleaning processes must be validated to ensure effectiveness.
3. Skilled Operators Needed
Operators must understand cleaning cycles, chemicals, and temperature control.
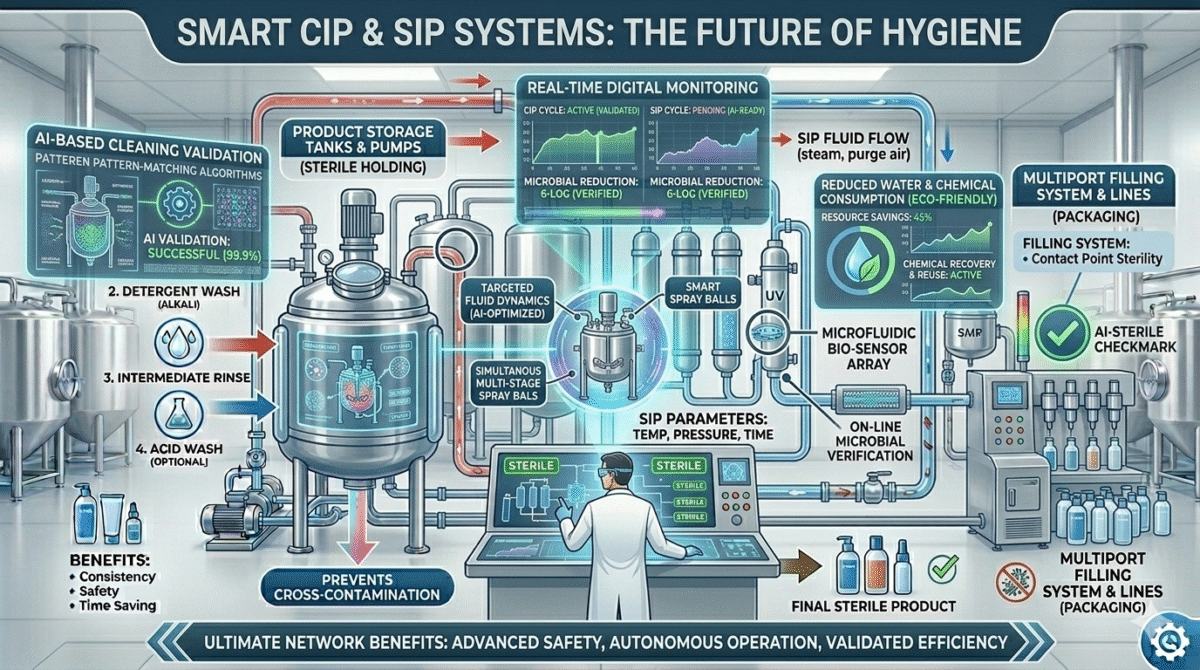
Future of CIP and SIP in Cosmetic Industry
With increasing focus on product safety and automation, CIP and SIP systems are becoming more advanced.
Future developments include:
- Smart automated cleaning systems
- Digital monitoring of cleaning cycles
- Reduced water and chemical consumption
- AI-based cleaning validation
These innovations will make cosmetic manufacturing more efficient and safer.
Conclusion
CIP (Clean-in-Place) and SIP (Sterilize-in-Place) are essential technologies used in the cosmetic industry to maintain high standards of cleanliness and sterility during manufacturing.
CIP systems help remove product residues, oils, and contaminants from equipment, while SIP systems eliminate microorganisms through high-temperature steam sterilization.
Together, these systems ensure that cosmetic products are manufactured in a safe, hygienic, and contamination-free environment.
As the cosmetic industry continues to grow, the use of advanced CIP and SIP systems will play an increasingly important role in maintaining product quality, meeting regulatory standards, and improving production efficiency.